
Are you looking to gain root access to your Android device, install a custom ROM, or explore the deeper functionalities of your phone’s operating system? The first step towards achieving these goals often involves unlocking the bootloader. This process, while potentially complex, grants you the freedom to modify the core software of your device, opening up a world of possibilities for customization and performance optimization. This article serves as a comprehensive guide, designed to provide a clear understanding of what bootloader unlocking entails and how to safely execute it on your Android phone or tablet.
Unlocking the bootloader is a crucial gateway for advanced Android customization. Think of it as removing a security lock that manufacturers put in place to protect the device’s software integrity. While beneficial for security in its original state, unlocking it allows you to install custom recoveries like TWRP, flash custom ROMs such as LineageOS or Pixel Experience, and ultimately gain root access. We’ll walk you through the necessary precautions, the required tools, and the general steps involved, empowering you to unlock your device’s full potential while understanding the associated risks and benefits. Remember to always back up your data before proceeding.
What is a Bootloader and Why is it Locked?
The bootloader is a critical piece of software on your Android device, acting as the intermediary between the hardware and the operating system. Think of it as the gatekeeper that decides which operating system or recovery environment your device will boot into.
Why is it locked? Manufacturers lock the bootloader for several key reasons:
- Security: A locked bootloader prevents unauthorized operating systems from being installed, which reduces the risk of malware and ensures the integrity of the device’s software.
- Warranty: Unlocking the bootloader can void your warranty, as it allows for modifications that the manufacturer does not support.
- Digital Rights Management (DRM): A locked bootloader can protect DRM content by preventing unauthorized access and copying.
- Device Stability: A locked bootloader ensures that the device runs on the software version that the manufacturer intended, reducing the chances of instability and errors.
In essence, a locked bootloader is a security measure and a way for manufacturers to maintain control over the device’s software environment.
Risks Involved in Unlocking Your Bootloader
Unlocking your Android device’s bootloader offers increased customization, but it also carries inherent risks. It is crucial to understand these potential drawbacks before proceeding.
One primary concern is the potential voiding of your device’s warranty. Most manufacturers explicitly state that unlocking the bootloader nullifies warranty coverage, as it involves modifying the device’s core software.
Furthermore, unlocking the bootloader can introduce security vulnerabilities. A locked bootloader provides a layer of protection against unauthorized access and malicious software. Unlocking it can make your device more susceptible to exploits.
Another risk is the possibility of bricking your device. Although rare with careful execution, incorrect procedures or incompatible software during the unlocking process can render your device unusable.
Finally, unlocking your bootloader typically wipes all data from your device. Ensure a complete backup is performed before commencing the process to avoid data loss. Carefully weigh these risks against the benefits before unlocking your bootloader.
Preparing Your Device Before Unlocking: Backup is Key
Before proceeding with unlocking your device’s bootloader, it is crucial to create a comprehensive backup of all important data. This process will typically wipe all data from your device, restoring it to its factory state. Failure to back up data may result in permanent data loss.
Here’s what you should back up:
- Contacts: Save to your Google account or export as a VCF file.
- Photos and Videos: Copy to your computer, cloud storage, or external drive.
- Documents: Backup any important files, PDFs, or spreadsheets.
- Apps and App Data: While some apps support cloud backup, others may require manual backup. Consider using a backup app for full coverage.
- SMS Messages: Use a dedicated SMS backup app.
- Call Logs: Utilize a call log backup application.
Consider a full system backup if possible. Some manufacturers provide tools for creating a complete device image, which can be restored in case of issues.
After backing up, verify that the backup is complete and accessible before proceeding.
Checking if Your Device Supports Bootloader Unlocking
Before proceeding with the bootloader unlocking process, it’s crucial to verify whether your Android device actually supports this operation. Not all manufacturers allow bootloader unlocking, and attempting to unlock a device that doesn’t support it can lead to irreversible damage.
Here’s how you can check:
- Check the Manufacturer’s Website: Many manufacturers provide information on their websites about which devices support bootloader unlocking and the specific procedures involved.
- Developer Options: On some devices, you can check within the developer options. Navigate to Settings > About Phone (or About Tablet) and tap the Build number repeatedly (usually 7 times) until developer options are enabled. Then, go to Settings > System > Developer options (or just Developer options) and look for an option like “OEM unlocking.” If this option is present and enabled, it generally indicates that bootloader unlocking is supported. However, the absence of this option doesn’t definitively mean it’s not supported.
- Device-Specific Forums: Online communities and forums dedicated to your specific device model are excellent resources. Users often share their experiences and insights regarding bootloader unlocking compatibility.
It is essential to confirm compatibility before attempting to unlock your bootloader to prevent bricking your device.
Obtaining the Unlock Code from Your Manufacturer
Once you’ve determined that your device supports bootloader unlocking, the next crucial step is obtaining the unlock code. This code is typically provided by the device manufacturer.
The method for acquiring this code varies between manufacturers. Some, like Xiaomi and OnePlus, offer tools or websites specifically designed for this purpose. You’ll usually need to create an account on their platform and register your device’s IMEI or serial number.
Other manufacturers might require you to contact their support team directly and request the unlock code. Be prepared to provide proof of ownership and a valid reason for wanting to unlock your bootloader. Some manufacturers may even void your warranty upon unlocking.
It is important to note that some carriers may block bootloader unlocking, regardless of the manufacturer’s policy. Research your device’s specific model and carrier to understand any potential limitations.
Keep the unlock code safe and secure, as it is essential for the next steps in the bootloader unlocking process. Follow the manufacturer’s instructions precisely to avoid damaging your device.
Using ADB and Fastboot: A Technical Overview
ADB (Android Debug Bridge) and Fastboot are essential tools for interacting with your Android device at a system level, particularly when unlocking the bootloader. They are part of the Android SDK Platform Tools package.
ADB allows communication with a device that is powered on and running. It facilitates tasks like installing applications, transferring files, and executing shell commands. Think of it as a bridge connecting your computer to the Android operating system.
Fastboot, on the other hand, is a protocol used to communicate with the bootloader. It operates when the device is in a special bootloader mode (usually accessed by holding specific button combinations during startup). Fastboot is crucial for flashing images, including the unlock command, directly to the device’s partitions.
To use ADB and Fastboot effectively, you need to:
- Install the Android SDK Platform Tools on your computer.
- Ensure your device has USB debugging enabled in the developer options.
- Have the correct USB drivers installed for your device.
Commands are entered via the command line or terminal, making it a command-line interface (CLI) driven process.
The Unlocking Process: Step-by-Step Guide
This section outlines the general steps required to unlock your Android device’s bootloader. Please be aware that the exact procedure may vary depending on your device manufacturer and model. Always consult your manufacturer’s official documentation before proceeding.
- Enable USB Debugging: Go to Settings > About Phone (or About Tablet) and tap “Build Number” repeatedly until “Developer options” are enabled. Then, go to Settings > Developer options and enable “USB debugging”.
- Connect to Your Computer: Connect your Android device to your computer using a USB cable. Ensure that ADB and Fastboot are properly installed and configured (refer to the “Using ADB and Fastboot” section).
- Boot into Fastboot Mode: This usually involves pressing a specific combination of buttons while powering on your device (e.g., Power + Volume Down). Refer to your device’s documentation for the correct key combination.
- Execute the Unlock Command: Open a command prompt or terminal window on your computer and navigate to the directory where ADB and Fastboot are installed. Then, execute the appropriate Fastboot command to unlock the bootloader. This command is often:
fastboot oem unlockorfastboot flashing unlock. - Confirm on Your Device: Your device may display a warning message. Use the volume buttons to navigate and the power button to confirm that you want to unlock the bootloader.
- Reboot Your Device: Once the unlocking process is complete, your device will reboot. This may take longer than usual.
Important: Unlocking the bootloader will typically erase all data on your device. Make sure you have a backup before proceeding.
Verifying Successful Bootloader Unlocking
After completing the bootloader unlocking process, it is essential to verify its success. This confirmation ensures that you can proceed with custom ROM installation, rooting, or other advanced modifications without encountering issues related to a locked bootloader.
Methods for Verification
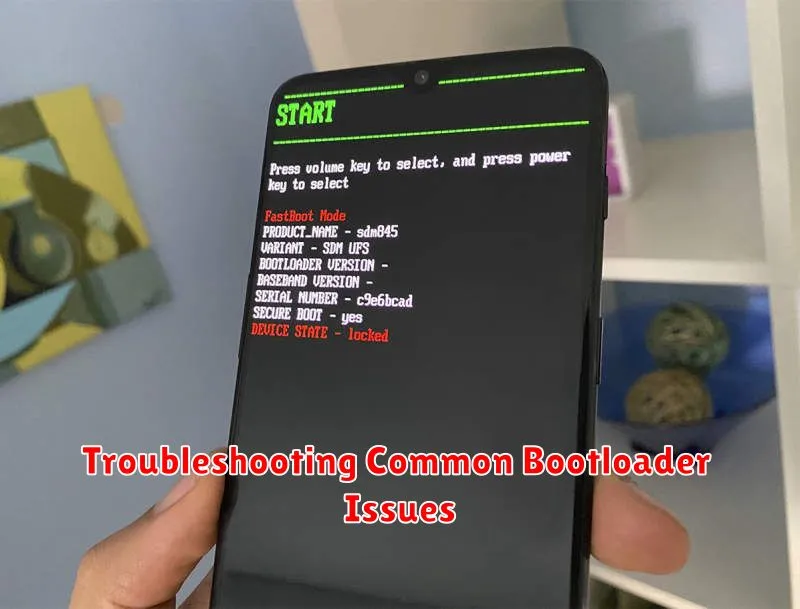
- Visual Inspection: Upon rebooting your device, a warning message or a different boot screen indicating an unlocked bootloader may appear. The specific message varies depending on the manufacturer. Look for phrases like “Unlocked Bootloader” or a security warning about the bootloader’s status.
- ADB Command: You can use ADB (Android Debug Bridge) to confirm the bootloader status. Connect your device to your computer in fastboot mode and execute the following command:
fastboot oem device-info. Look for a line that states “Device Unlocked: true”. If it shows “false,” the bootloader is still locked.
If the verification methods confirm that the bootloader is unlocked, you can confidently proceed with any subsequent modifications. If it’s still locked, carefully re-execute the unlocking process, ensuring each step is followed precisely.
What to Do After Unlocking Your Bootloader

Once you have successfully unlocked your Android device’s bootloader, you unlock a world of customization and advanced modifications. Here are several options you can consider:
- Install a Custom Recovery: Custom recoveries like TWRP (Team Win Recovery Project) allow you to flash custom ROMs, kernels, and other modifications.
- Root Your Device: Rooting grants you superuser access, enabling you to install root-requiring apps and perform system-level tweaks.
- Flash a Custom ROM: Custom ROMs offer different features, performance improvements, or a completely redesigned user interface compared to the stock ROM.
- Install Custom Kernels: A custom kernel can improve performance, battery life, or add new features to your device.
- Back Up Your Stock ROM: It is prudent to create a backup of your original ROM, allowing you to revert to the factory state if needed.
Proceed with caution and ensure you understand the potential risks associated with each modification. Research thoroughly and follow reliable guides to avoid bricking your device.
Relocking the Bootloader: When and Why?
Although unlocking your bootloader grants significant flexibility, there are situations where relocking it becomes advisable or necessary. Relocking essentially reverses the unlocking process, restoring the device to its original factory settings in terms of bootloader security.
Reasons for Relocking
Several factors might prompt you to consider relocking:
- Warranty Concerns: Some manufacturers may void your device’s warranty if the bootloader is unlocked. Relocking can potentially reinstate warranty coverage, although this depends on the manufacturer’s specific policies.
- Official Updates: Unlocked bootloaders can sometimes prevent the installation of official Over-The-Air (OTA) updates from the manufacturer. Relocking ensures compatibility with these updates.
- Selling or Giving Away Your Device: For security and privacy reasons, it’s recommended to relock the bootloader before selling or giving away your device. This prevents unauthorized access to your data.
- Enhanced Security: A locked bootloader provides a higher level of security against malicious software and unauthorized modifications to the operating system.
The Relocking Process
Relocking typically involves using the same ADB and Fastboot tools used for unlocking, but with a different command. The specific command may vary depending on your device manufacturer, so consult their documentation for accurate instructions. Be aware that relocking usually wipes all data from your device, so back up important information beforehand.
Troubleshooting Common Bootloader Issues
Unlocking your bootloader can sometimes lead to issues. This section addresses some common problems encountered and provides potential solutions.
Device Not Recognized by ADB/Fastboot
If your computer doesn’t recognize your device in ADB or Fastboot mode, ensure you have installed the correct USB drivers for your specific Android device. Reinstalling or updating the drivers often resolves this. Also, verify that USB debugging is enabled in the Developer Options.
Unlock Command Not Working
If the unlock command fails, double-check that you have the correct unlock code from your manufacturer, if required. Ensure you are running the command in the correct Fastboot mode. Certain devices may require specific commands or parameters to initiate the unlocking process successfully.
Device Stuck in Bootloop
A bootloop (device repeatedly restarting) can occur if something goes wrong during the unlocking process. Try flashing the original stock firmware provided by your manufacturer using Fastboot. This often restores the device to a working state. Make sure the firmware is the correct version for your device.
Error Messages
Pay close attention to any error messages displayed during the process. Search online forums or the manufacturer’s website for solutions related to the specific error code or message you encounter. Error messages provide valuable clues for identifying and resolving the problem.