
In today’s digital age, we spend countless hours staring at screens, from our smartphones and tablets to laptops and desktop computers. This constant exposure can lead to significant eye strain, a common condition characterized by symptoms like headaches, blurred vision, dry eyes, and neck pain. One of the most effective and simple ways to mitigate this problem is to reduce screen brightness. This article will guide you through various methods for adjusting screen brightness across different devices, helping you protect your vision and enhance your overall digital well-being.
Understanding the impact of excessive screen brightness is crucial for proactive eye care. When screens are set too bright, our eyes have to work harder to process the visual information, leading to fatigue and discomfort. By implementing simple adjustments to screen brightness, users can significantly decrease eye strain and promote a more comfortable viewing experience. We will explore the built-in settings on iOS, Android, Windows, and macOS devices, offering practical tips and step-by-step instructions to optimize your screen’s brightness for various lighting conditions and times of day, ensuring you can enjoy your digital devices without compromising your eye health.
Understanding the Importance of Screen Brightness for Eye Health
Prolonged exposure to screens, a common aspect of modern life, can contribute to eye strain and other visual discomforts. One crucial factor in mitigating these issues is managing screen brightness. When a screen is too bright, particularly in low-light environments, it forces your eyes to work harder to process the intense light. This can lead to symptoms such as headaches, dry eyes, blurred vision, and fatigue.
Conversely, a screen that is too dim can also cause strain. In this scenario, your eyes struggle to focus and discern details, leading to similar symptoms. Finding the optimal brightness level that complements the ambient lighting is essential for maintaining eye health and preventing discomfort. This involves adjusting the screen’s luminosity to a level that allows for comfortable viewing without excessive effort.
Therefore, understanding the impact of screen brightness on eye health is the first step towards adopting healthier screen habits. Consistent and appropriate adjustment of brightness settings is a simple yet effective way to protect your vision and enhance your overall well-being.
Adjusting Brightness Settings on Android Devices
Adjusting the screen brightness on your Android device is a straightforward process that can significantly reduce eye strain. Here’s how to do it:
Method 1: Quick Settings Panel
The quickest way to adjust brightness is through the Quick Settings panel. Swipe down from the top of your screen to access it. Look for the brightness slider, usually represented by a sun icon. Drag the slider to the left to decrease brightness and to the right to increase it.
Method 2: Settings App
For more granular control, navigate to the Settings app. The brightness setting is commonly found under “Display” or “Display & Brightness.” Within this section, you will find the brightness slider and possibly options for adaptive brightness.
Adaptive Brightness
Most Android devices offer an adaptive brightness feature. When enabled, your device will automatically adjust the screen brightness based on ambient light conditions. While convenient, it might not always be optimal for your eyes, so manual adjustment may still be necessary.
Adjusting Brightness Settings on iOS Devices (iPhone & iPad)
Adjusting the screen brightness on your iOS devices is a straightforward process that can significantly reduce eye strain. Here’s how to do it:
Method 1: Using the Control Center
The quickest way to adjust brightness is through the Control Center. Swipe down from the top-right corner of your screen (on iPhones with Face ID) or swipe up from the bottom edge of the screen (on iPhones with a Home button). You’ll see a brightness slider represented by a sun icon. Simply drag the slider to the left to decrease brightness and to the right to increase it.
Method 2: Through the Settings App
For more granular control, navigate to the Settings app. Then, select “Display & Brightness”. Here, you’ll find the same brightness slider as in the Control Center. You can also toggle on “Automatic” which will use the ambient light sensor to adjust the brightness based on your surrounding environment.
Note: Lowering brightness, especially in dark environments, can help alleviate eye fatigue and promote more comfortable screen viewing.
Using Auto-Brightness Features: Pros and Cons
Auto-brightness is a common feature on most modern devices, designed to automatically adjust screen brightness based on ambient light levels. While convenient, it’s important to understand both its advantages and disadvantages.
Pros:
Convenience: No need to manually adjust brightness in varying lighting conditions.
Battery Saving: In some environments, auto-brightness can help conserve battery life by dimming the screen when appropriate.
Adaptability: Reacts dynamically to changing light, providing optimal viewing in different situations.
Cons:
Inconsistency: The automatic adjustments may not always be accurate or to your preference, leading to fluctuating brightness levels that can be distracting.
Sensor Dependence: Relies on the device’s ambient light sensor, which can be inaccurate or blocked, leading to incorrect brightness settings.
Potential Eye Strain: Frequent brightness changes can sometimes contribute to eye strain, especially if the adjustments are too drastic or frequent.
Enabling Dark Mode: Reducing Blue Light Emission
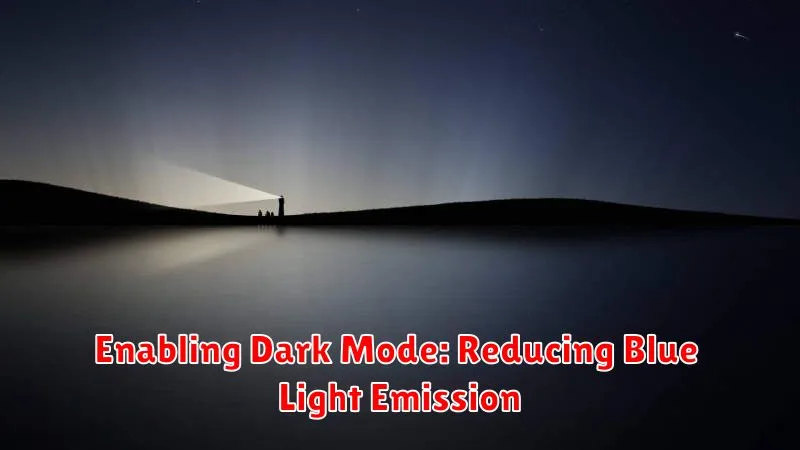
Dark mode, also known as night mode, reverses the typical light-on-dark color scheme to a dark-on-light scheme. This can significantly reduce the amount of blue light emitted from your screen.
Blue light, a high-energy visible light, can contribute to eye strain and potentially disrupt sleep patterns. By enabling dark mode, you minimize your exposure to this type of light, especially during evening hours.
Most modern operating systems, including Android, iOS, Windows, and macOS, offer system-wide dark mode options. You can also find dark mode settings within individual applications.
While dark mode can be beneficial, it’s important to note that its effectiveness can vary depending on screen technology and ambient lighting conditions. Experiment to see if it reduces eye strain for you.
Utilizing Blue Light Filters: Software and Built-In Options
Blue light filters are designed to reduce the amount of blue light emitted from screens, which can disrupt sleep patterns and contribute to eye strain. These filters come in various forms, offering users flexibility in how they mitigate blue light exposure.
Built-In Options
Many modern devices now include built-in blue light filters. These are often found in display settings and can be toggled on or off. Activating this feature typically gives the screen a warmer, yellowish tint.
Software Solutions
Numerous software applications offer blue light filtering capabilities. These apps often provide more granular control over the filter’s intensity and scheduling. Some popular options include f.lux for desktops and Twilight for Android.
Benefits of Blue Light Filters
The primary benefit is reduced eye strain and improved sleep quality, especially when using devices before bedtime.
Considerations
While effective, blue light filters can alter the color accuracy of the screen. Users involved in color-sensitive tasks, such as photo or video editing, may need to disable the filter temporarily. It’s also important to choose reputable software to avoid potential security risks.
Third-Party Apps for Brightness Control and Eye Protection
Beyond built-in features, numerous third-party applications offer enhanced control over screen brightness and blue light emission. These apps often provide granular adjustments not available in default settings, allowing users to fine-tune their display for optimal comfort.
Key features found in such apps may include:
- Customizable Brightness Levels: Finer control than standard brightness sliders.
- Blue Light Filtering: Adjustable intensity and scheduling of blue light reduction.
- Color Temperature Adjustment: Shifting the screen’s color palette towards warmer tones.
- Screen Dimming Below System Minimum: For extremely dark environments.
- Automatic Scheduling: Adjustments based on time of day or location.
It is crucial to research and select reputable apps with positive user reviews and transparent privacy policies. Consider factors such as battery consumption and system resource usage before installation.
Calibrating Screen Colors for Comfortable Viewing
Beyond simply adjusting brightness, calibrating screen colors is crucial for reducing eye strain. Default color profiles may not be optimal for extended viewing, leading to discomfort.
Color temperature is a key factor. Warmer colors (lower Kelvin values) emit less blue light, which can disrupt sleep and cause eye fatigue. Most operating systems offer built-in tools to adjust color temperature.
Consider these points when calibrating:
- White Balance: Ensure white appears neutral, not overly blue or yellow.
- Contrast: Adjust contrast for optimal text readability without straining your eyes.
- Gamma: Gamma settings affect the brightness of midtones. Adjust to achieve a comfortable balance.
Utilize built-in display calibration tools in your operating system or explore third-party software for more precise control. Remember, the goal is to create a comfortable and visually balanced viewing experience tailored to your individual preferences and environmental conditions.
Scheduling Brightness Adjustments: Automating for Different Times of Day
To further mitigate eye strain, consider scheduling automatic brightness adjustments on your devices. This feature allows your screen’s brightness to adapt based on the time of day, promoting comfortable viewing in various lighting conditions.
Benefits of Scheduled Adjustments
Utilizing this feature provides numerous advantages:
- Reduced Eye Strain: Automatically lowers brightness during evening hours.
- Improved Sleep Quality: Minimizes exposure to blue light before bedtime.
- Convenience: Eliminates the need to manually adjust brightness throughout the day.
- Customization: Configure schedules to align with your specific daily routine.
Implementation
Most modern devices offer built-in scheduling options within their display settings. Explore the settings on your Android or iOS device to configure a personalized brightness schedule. You may also find third-party applications that provide even more granular control over scheduling and color temperature adjustments.
Ergonomic Considerations: Optimizing Your Viewing Environment
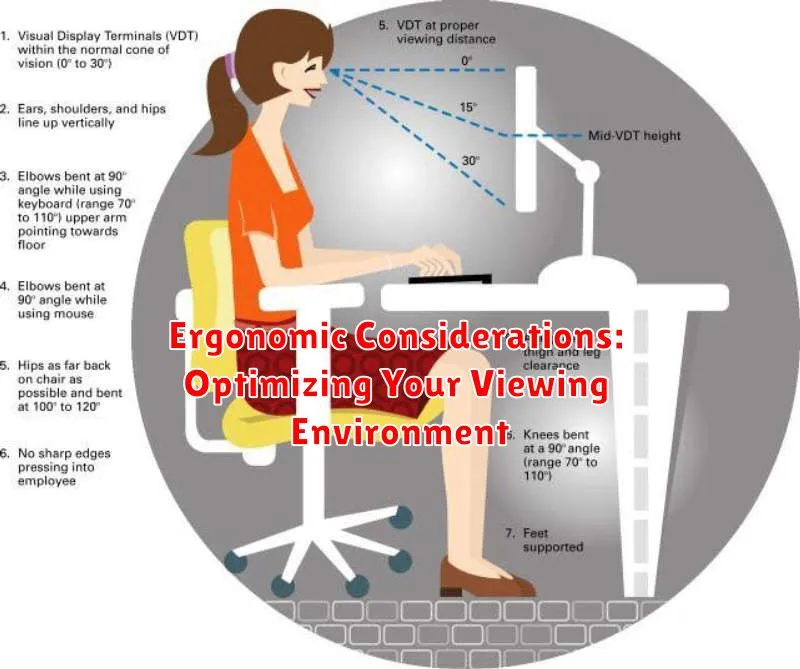
Optimizing your viewing environment is crucial for minimizing eye strain. Adjusting screen brightness is just one piece of the puzzle; proper ergonomics play a significant role in long-term eye health and overall comfort.
Monitor Placement
Position your monitor at arm’s length and ensure the top of the screen is at or slightly below eye level. This reduces neck strain and promotes a more natural viewing angle.
Ambient Lighting
Minimize glare by positioning your monitor perpendicular to windows or bright light sources. Use blinds or curtains to control excessive sunlight. Adjust ambient lighting to match the screen brightness to further reduce eye strain.
Chair and Posture
Use an adjustable chair that provides proper lumbar support. Maintain good posture by sitting upright with your feet flat on the floor or on a footrest. Avoid slouching, as this can contribute to neck and back pain, indirectly affecting eye comfort.
Regular Breaks
Implement the 20-20-20 rule: every 20 minutes, look at something 20 feet away for 20 seconds. This helps relax your eye muscles and prevents fatigue.